Wednesday, November 14, 2018
Atlas Biomechanics : Orthotic Molding Guide for Heat Moldable Arch Supp...
Atlas Biomechanics : Orthotic Molding Guide for Heat Moldable Arch Supp...: Atlas Biomechanics' thermoplastic heat moldable custom orthotic blanks allow you to produce a lab quality orthotic in office in about ...

Orthotic Molding Guide for Heat Moldable Arch Supports
Atlas Biomechanics' thermoplastic heat moldable custom orthotic blanks allow you to produce a lab quality orthotic in office in about 10 minutes for a fraction of the price. Atlas Biomechanics offers dress and athletic orthotic blanks and prefab orthotic.
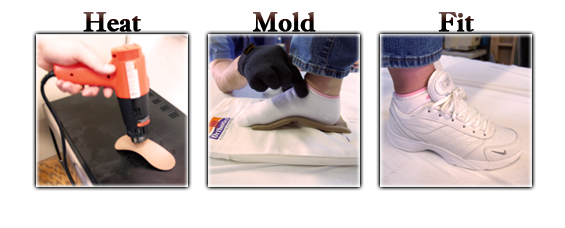
Orthotic Molding Guide
Sizing the Orthotic Blank to the Foot
Rather than go by the shoe size, it is better to hold the orthotic blank directly to the foot.
Fit the orthotic just proximal to the metatarsal heads and just a little (1-2mm) behind of the heel.
After deciding which blank to use, hold it directly to the foot.
Do not fit the blank while the patient is standing on the blank.
Dorsiflex the hallux (big toe) to see if the metatarsal head clears the end of the orthotic.
Heating the Orthotic Blank
There are 3 Ways to Heat the Blank
1) Purchase a heat gun (not a hairdryer) and heat resistant gloves at any hardware store.
Place the blank on a surface that will not burn from heat.
Hold the heat gun 1cm (1/2 inch) away from the blank.
Slowly move the heat gun up and down the blank.
Do not stop moving the heat gun ( you will melt the orthotic).
The average time is about 1.5-2 minutes.
Wearing heat resistant gloves you may push the arch to check for softness.
If it is still stiff, reheat for 10-15 seconds.
2) Boil water and turn off heat.
Wait 1 minute and then place the orthotic blank in the hot water.
Let the orthotic blank sit in the water for 1 minute.
Using heat-resistant gloves place the orthotic under the shoe's insole.
Step into the shoe and press down for 2 minutes to mold the orthotic to your foot
3) Atlas Biomechanics also recommends using a toaster oven at 200 degrees.
Molding the Orthotic Blank to the Foot
You can mold the blank either as Subtalar Neutral or Calcaneal Resting Position, or a combo of each.
You can mold the blank while sitting, standing in a shoe (ski boot, ice skate, golf shoe or ballet flats) or on
a pillow.
Do not mold directly to the foot. Use a heat protector such as a towel, double socks or the shoe's insole.
Make sure the rear of the orthotic is not too far forward on the foot.
Make sure the medial side of the orthotic covers the arch entirely.
Either hold the foot in Subtalar Joint Neutral or Calcaneal Resting Position and have the patient press firmly down.
If molding directly in a gym shoe, use the insole as the heat protector. Place the orthotic under the insole and have the patient press down.
After the patient has molded the orthotic, place it in their shoes. It is most comfortable under the insole.
Break-in Period
As with any new device in their shoe, there is a break in period.
If using the orthotic in gym shoes, place it under the insole.
If wearing it in dress shoes, use a little double-sided tape to hold in place.
Have the patient wear the orthotic only 2 hours the first day.
Every additional day increases the time by 2 hours.
It uncomfortable, have them remove the orthotic, wait 2 hours and resume the break-in period.
Atlas Biomechanics recommends the patient return in two weeks for a follow-up and fine tuning of the orthotic.
Molding Tips
To avoid any problems, you want the patient to be happy with the fit before they leave the office.
Make sure the orthotic is feeling fine to the patient and fits well.
Remember this orthotic can be modified endless ways with the heat gun.
Sometimes the patient will feel that the arch is either too high or low, modify it to their comfort level.
You may see waves in the orthotic. This is the bony prominences of the foot that have been captured in the orthotic and is an accurate mold that should be comfortable on the foot.
Teri Green
Atlas Biomechanics
Thursday, November 8, 2018
Atlas Biomechanics : NailZyme; All Natural Fungal ToeNail Solution
Atlas Biomechanics : NailZyme; All Natural Fungal ToeNail Solution: NailZyme is an all natural fungal toenail solution from Atlas Biomechanics. It will thin, lighten and soften thick fungal toenails with regu...
NailZyme; All Natural Fungal ToeNail Solution
NailZyme is an all natural fungal toenail solution from Atlas Biomechanics. It will thin, lighten and soften thick fungal toenails with regular use. NailZyme is enzyme-infused for a potent fungus nail thinner.
NailZyme's active enzyme ingredients are protease, lipase, amylase, lactase, cellulase, and bromelain. These all natural enzymes are infused into Jojoba Oil, Tea Tree Oil, Peppermint Oil, and Sesame Oil.
1 bottle of NailZyme lasts about 1 month. It comes in a 1-ounce bottle with an easy dropper top. It is proudly manufactured in the USA.

Directions for NailZyme
Apply 1-2 drops to thick toenail twice per day.
Trim away softened nail.
Should see results after a month.
Discontinue if skin or nail gets red or irritated.
Teri Green
Atlas Biomechanics
Tuesday, October 30, 2018
Atlas Biomechanics : How to use U Shaped Stick On Foot Callus Pads
Atlas Biomechanics : How to use U Shaped Stick On Foot Callus Pads: Stick on foot pads will cushion and protect callus and bunions. They are really easy to use. 1. Make sure skin is clean and free of oils a...
How to use Gel, Re-usable Stick On Foot Callus Pads
Stick on gel foot pads will cushion and protect callus and bunions. They are really easy to use.
When you spend all day on your feet, proper protection keeps your feet healthy and your mind focused on the task at hand. If you’ve ever suffered through a workday with painful calluses on your feet, you’re well aware that an ounce of prevention is worth a pound of cure! Take care of your feet with gel, re-usable, self adhesive stick-on foot pads. Reusable adhesive gel foot pads are easy to wash with warm, soapy water, making for a long-lasting way to prevent blisters that can get infected or turn into tough calluses. Simply apply the sticky gel pad for feet to the areas most prone to friction, take them off at night to wash them, and lay them out flat to dry so they become sticky and ready to use again in the morning.
1. Make sure skin is clean and free of oils and cream.
2. Isolate the are you want to cushion and protect.
3. Peel off u shaped callus foot pad from the paper.
4. Place over the callus or bunion.
5. Firmly press the callus cushion to the skin.
Directions:
-Apply gel foot pad to clean, oil/cream free and dry foot.
-Place gel foot cushion directly to skin.
-Remove gel foot protector at night to allow skin to breathe.
-Remove by gently peeling away from skin.
-Hand wash with warm soapy water and air dry to allow pad to get sticky again.
 Reusable Gel Foot Cushion Packs
Stick On U Shaped Foot Pads with Adhesive Backing
Foot pads for callus cushion
Treat callus (callous), not a callous remover
Callus pads are foot products to protect painful callous
Can be used as bunion pads
Medical grade gel
Will stay sticky for months
1/8 inch thick
Teri Green
Atlas Biomechanics
When you spend all day on your feet, proper protection keeps your feet healthy and your mind focused on the task at hand. If you’ve ever suffered through a workday with painful calluses on your feet, you’re well aware that an ounce of prevention is worth a pound of cure! Take care of your feet with gel, re-usable, self adhesive stick-on foot pads. Reusable adhesive gel foot pads are easy to wash with warm, soapy water, making for a long-lasting way to prevent blisters that can get infected or turn into tough calluses. Simply apply the sticky gel pad for feet to the areas most prone to friction, take them off at night to wash them, and lay them out flat to dry so they become sticky and ready to use again in the morning.
1. Make sure skin is clean and free of oils and cream.
2. Isolate the are you want to cushion and protect.
3. Peel off u shaped callus foot pad from the paper.
4. Place over the callus or bunion.
5. Firmly press the callus cushion to the skin.
Directions:
-Apply gel foot pad to clean, oil/cream free and dry foot.
-Place gel foot cushion directly to skin.
-Remove gel foot protector at night to allow skin to breathe.
-Remove by gently peeling away from skin.
-Hand wash with warm soapy water and air dry to allow pad to get sticky again.

Stick On U Shaped Foot Pads with Adhesive Backing
Foot pads for callus cushion
Treat callus (callous), not a callous remover
Callus pads are foot products to protect painful callous
Can be used as bunion pads
Medical grade gel
Will stay sticky for months
1/8 inch thick
Teri Green
Atlas Biomechanics
Tuesday, October 16, 2018
Atlas Biomechanics : Felt Arch Pad
Atlas Biomechanics : Felt Arch Pad: Felt Arch Pads + Felt Arch Support (Arch Cookie) + Relieves Plantar Fasciitis and Heel Spur Pain + Superior Longitudinal Arch Support ...
Subscribe to:
Posts (Atom)